


The 2013 Moto G — codename falcon — is more than a decade old, and plenty of them are still alive as spare phones, media players, test devices, and first phones for kids. If you're reviving one in 2026, the good news is that Motorola's official bootloader-unlock portal still works, TWRP still officially supports the phone, and the overall process hasn't fundamentally changed. The bad news: half the tools the original 2013 tutorials relied on are dead, and this guide replaces every one of them.
I still keep a first-gen Moto G in a drawer as a backup phone, which is exactly why this guide needed a rewrite — everything below was re-checked against what still works this year.
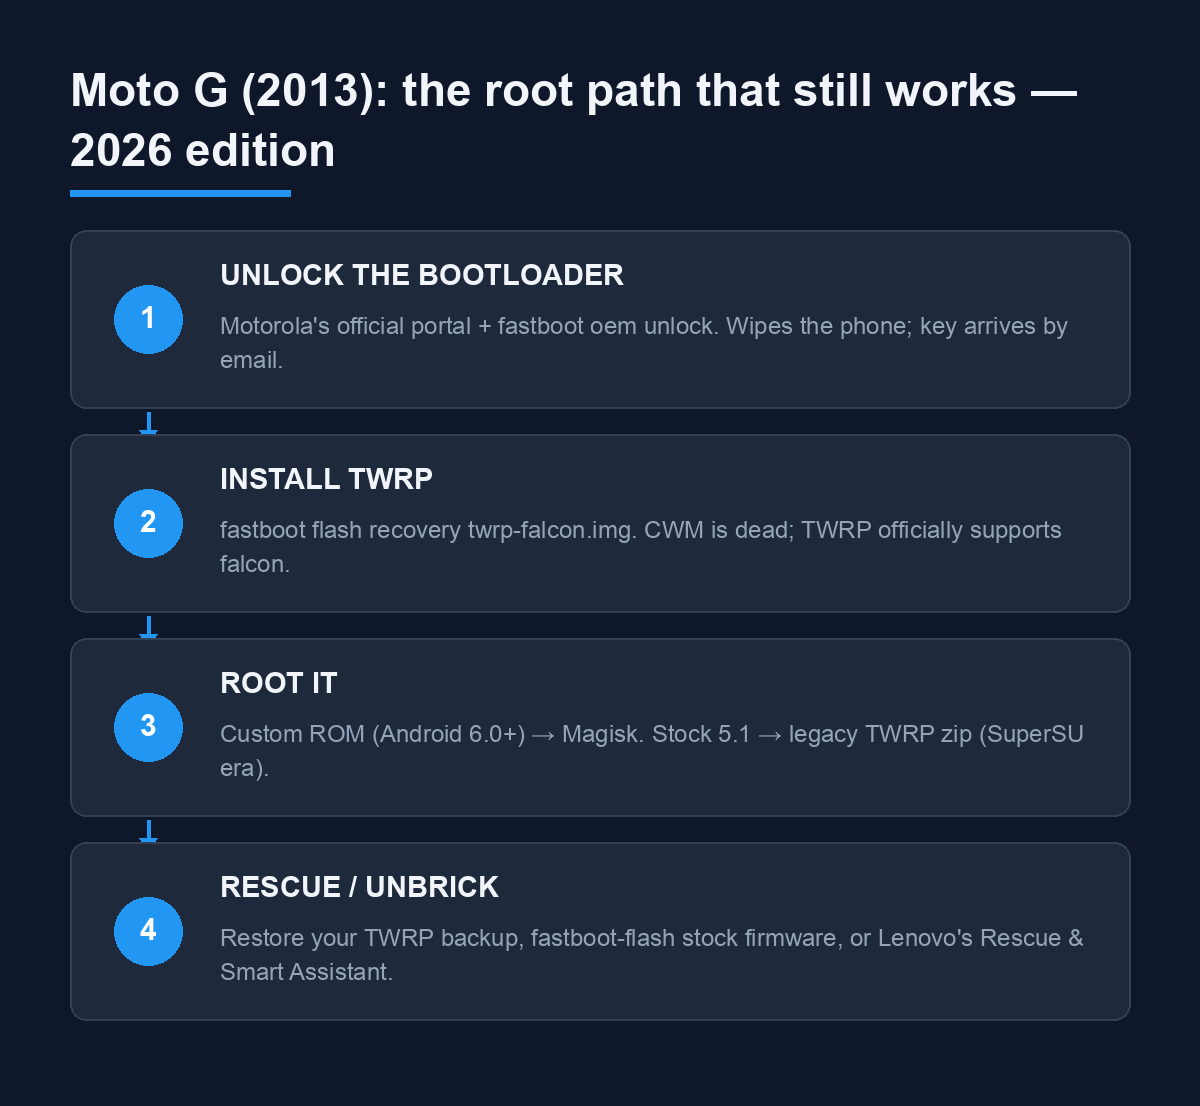
Quick answer: Yes, the 2013 Moto G can still be rooted in 2026. Unlock the bootloader through Motorola's official portal, flash TWRP, then root. One catch: stock firmware ends at Android 5.1, which current Magisk won't run on — so root on a custom ROM, or use a legacy method if you stay on stock.
What changed since the original guide
The old version of this article was written in 2013, when the toolkit looked very different. Here's what happened to it:
| Old tool (2013) | Status in 2026 | Use instead |
|---|---|---|
| CWM (ClockworkMod) recovery | Project abandoned years ago | TWRP — officially supports the Moto G 2013 |
| Superboot root package | Gone from its original home | Magisk, on a custom ROM |
| RSD Lite + edited-XML unbrick trick | Discontinued; only unofficial rehosts circulate | TWRP backups, fastboot, Rescue & Smart Assistant |
| "Open Command Window Here" XP powertoy | Pointless since Windows Vista | Built in — right-click → Open in Terminal |
None of those four are safe recommendations anymore, which is why they've been pulled from the steps below.
Before you start
- Back up everything. Unlocking the bootloader wipes the phone completely — photos, accounts, apps, internal storage.
- Charge the phone past 50% and use a data-quality USB cable (not a charge-only cable — this is the single most common cause of "fastboot won't detect my device").
- A Windows, macOS or Linux PC.
- Platform-tools (adb and fastboot) from Google's official Android developer download page. The old ClockworkMod ADB installer page some 2013 guides linked still loads, but it's a 2014 artifact — Google's package is the maintained one.
- Motorola USB drivers on Windows, from Motorola's support page.
- USB debugging enabled: Settings → About phone → tap Build number seven times → back out → Developer options → enable USB debugging.
One reassurance while we're here: a 2013 handset is long out of warranty, so the usual "unlocking voids the warranty" warning is moot. The unlock flag is permanent and shows a warning line at every boot — cosmetic, nothing more.
Step 1 — Unlock the bootloader (the official route)
Motorola runs an official unlock portal, and it still accepts the 2013 Moto G. This is the same flow the original guide described, cleaned up for modern Windows and current fastboot:
1. Install platform-tools and the Motorola drivers, then open a terminal in the platform-tools folder (on Windows 11: right-click the folder → Open in Terminal; no powertoy needed).
2. Connect the phone, approve the USB-debugging prompt, and confirm the connection with `adb devices`.
3. Reboot into the bootloader: `adb reboot bootloader` (or hold power + volume down while turning the phone on).
4. Run `fastboot oem get_unlock_data`. It returns five lines — stitch them into one continuous string with no spaces and no `(bootloader)` prefixes. It looks like this:
“`
0A40040192024205#4C4D355631323030373731363031303332323239#BD008A672BA4746C2CE02328A2AC0C39F951A3E5#1F5328000200000000000000000000000000000000#0000000000000000
“`
5. Paste that string into the check box on Motorola's bootloader unlock page, sign in with a Motorola account, and request the unlock key — a 20-character code arrives by email. Read the warnings on that page before you confirm; this is the step that wipes the phone.
6. Back in the terminal: `fastboot oem unlock YOUR-KEY-HERE`
7. The phone wipes, reboots, and the bootloader is unlocked. Restore your backup.
The portal has been stable for a decade, but if it ever refuses a device ID, the XDA community thread on rooting the Moto G is where current workarounds and fellow falcon owners surface first.
Step 2 — Install TWRP recovery
CWM is dead — ClockworkMod stopped development years ago. Its replacement, TWRP (Team Win Recovery Project), has an official, maintained page for the Moto G 2013 with live downloads for the falcon build.
1. Download the latest `twrp-falcon.img` from the official TWRP page.
2. Boot back into the bootloader and flash it:
“`
fastboot flash recovery twrp-falcon.img
“`
3. Boot straight into recovery (power + volume down). TWRP's own documentation warns that the stock ROM can overwrite a custom recovery on the first reboot — booting directly into TWRP lets it patch that so the install sticks.
Once you're in TWRP's blue interface, do one thing before anything else: make a full backup (Backup → tick System, Data, Boot → swipe). Store it on a microSD card or copy it to your PC. That backup is your best unbrick insurance — Step 4 leans on it.
Step 3 — Root it (the honest 2026 version)
The original guide's Superboot method is gone, and there's a newer catch: current Magisk requires Android 6.0 or higher, and the Moto G 2013's stock firmware ends at Android 5.1 Lollipop. So the one-step "flash Magisk, done" path doesn't exist on stock. Two realistic routes:
Route A — custom ROM first (recommended). Unofficial ROMs for the falcon up to roughly the Android 10–11 era still circulate in the XDA falcon section — official LineageOS support ended at 14.1 (Android 7.1), but community builds went further. Pick the newest maintained build you can find, copy the zip (plus GApps if you want Play Store) to your SD card, then in TWRP: Wipe → flash ROM → reboot. Once you're on a 6.0+ ROM, rooting is the modern two-step: patch the ROM's boot image in the Magisk app, then `fastboot flash boot magisk_patched.img`.
Route B — stay on stock 5.1. Legacy root zips from the SuperSU era still flash fine through TWRP (Install → select the zip → swipe). They work, but they're unmaintained mid-2010s software on a phone that's already missing a decade of security patches. Only take this route if you specifically need stock firmware — Route A gives you a newer, still-patched-enough system and root.
Manage expectations either way: this is a 1 GB RAM phone in 2026. Root and a custom ROM make it a much better spare device, not a daily driver.
Step 4 — Unbrick a soft-bricked Moto G
The original fix here was RSD Lite with an edited firmware XML. RSD Lite is discontinued — the only copies left are unofficial rehosts on file-sharing sites, and I won't send you to one of those. What works instead, in order of preference:
1. Restore your TWRP backup. Boot recovery (power + volume down), Wipe → Format data, then Restore → pick the Step-2 backup. Fixes almost every soft brick in ten minutes.
2. Fastboot-flash stock firmware. Boot the bootloader and flash the stock boot/system images for your exact XT variant (community firmware archives list them per model). Same commands you already used in Steps 1–2.
3. Rescue & Smart Assistant. Motorola's official rescue utility — now branded "Software Fix" and hosted on Lenovo's support site. It detects the connected phone in bootloader mode and reinstalls the official firmware automatically. Slowest option, safest result.
A hard brick — no boot logo, no charge light, nothing in fastboot — is a hardware-level failure no software method fixes.
FAQ
Is it still worth rooting a 2013 Moto G in 2026?
For debloating, ad-blocking, and full-device backups on a spare phone, yes. Just calibrate expectations: with 1 GB of RAM, root won't turn it back into a daily driver. Root is genuinely more useful on a custom ROM (Route A) than on end-of-life stock firmware, where it mostly buys you legacy tweak apps.
Does unlocking the bootloader erase everything?
Yes — `fastboot oem unlock` wipes internal storage completely: photos, apps, accounts, everything on the phone itself. Move any files that matter to a PC or SD card first, and expect to sign into everything again after the reboot.
Can I root the Moto G without a PC?
Not realistically. The one-click root apps that 2014-era guides recommended are dead or unsafe by today's standards, and the falcon's unlock process requires fastboot from a computer. A PC and a data cable are non-negotiable for this phone.
What happened to CWM recovery?
ClockworkMod, the standard recovery of the early 2010s, stopped development years ago. TWRP took over as the default and still maintains an official build for the Moto G 2013. The commands barely changed — it's still `fastboot flash recovery <image>.img`.
What's the newest Android a Moto G 2013 can run?
On stock firmware: Android 5.1 Lollipop, which is the final official release. On custom ROMs: official LineageOS support ended at 14.1, with unofficial builds reaching roughly the Android 10–11 era. Anything newer runs into the 1 GB RAM limit and the phone's small system partition.
Is the bootloader unlock reversible?
No. The unlocked flag is permanent — relocking with `fastboot oem lock` is possible, but the phone will never again be in its factory-locked state. On a thirteen-year-old device that's out of warranty, it costs you nothing practical.
Related reading
- What Can You Do After Rooting Samsung Galaxy S9+ — what root actually unlocks day to day
- Superb Xposed Modules to Get the Best Out of Your Android Phone — post-root tweaks worth trying
- Android Phone Running Slow and Freezing? Causes and Fixes — keep an ageing phone usable
- How to Fix Google Play Services Battery Drain (No Root Needed) — the no-root fix for Android's most common drain
Got your falcon booting again? Tell us in the comments which route you took — custom ROM or stock 5.1.






I own a Moto G but I don’t feel there is any necessity to root it.
Are there any advantages of rooting it ?
It depends on your need and android addiction. If you’re a normal user, rooting isn’t a great turn for you. But if you want to tweak your phone by changing fonts, ROMs, kernels, go for rooting. That’s it.