

Shopify's setup flow has moved since this page went up in 2022. The two-week trial is gone, the default theme changed, the store password page is now called private mode, and the button that publishes your shop is called Launch store. The prices changed too. What follows is the order that works in late 2026, starting from an empty account.
Demand is not the hard part. US e-commerce revenue was modelled at about $1.15 trillion in 2025, with Statista's tracker projecting growth through 2031. Finishing the setup properly is what separates a store that sells from one that sits.
Steps checked against Shopify's Help Center setup and launch documentation, the Theme Store, and the India pricing page in November 2026.
Quick answer: Start a 3-day trial at shopify.com and answer the setup questions. Add products under Products, pick a free theme under Online Store, then set payments, shipping and taxes in Settings. Connect a domain, place a test order, choose a plan and click Launch store.
What you need before step one
- An email address you actually check, and a store name you can live with.
- Business details: registered name, address, phone, and a GSTIN if you have one.
- Product photos and packed weights. Weight decides your shipping rates, so weigh a box rather than guessing.
- A payment gateway account for India. Razorpay and Cashfree are the usual picks, and both want PAN, a business bank account and KYC.
- Shipping rates you have priced with a courier, plus a returns policy you can honour.
- A domain, if you already own one. You can launch on yourstore.myshopify.com and connect the domain later.
Step 1: Start the trial and answer the setup questions
Go to shopify.com and start the free trial. It runs for three days with no card, and in India it continues at ₹20 a month for the first three months before standard pricing starts.
Signup asks what you plan to sell, whether you already have products, and where you want to sell. Answer plainly. The answers only shape your starting setup and you can change them later. Your store name becomes your myshopify.com address, so pick something you would not mind customers seeing.
Step 2: Learn five screens and ignore the rest
The admin is smaller than it looks. Home holds the setup guide and your sales summary. Orders is where paid orders land. Products holds the catalogue and stock. Online Store holds themes, pages, navigation and preferences. Settings holds payments, shipping, taxes, domains and policies. Everything else is optional at this stage.
Sidekick, the assistant included on every plan, is useful for one job while you set up: asking where a setting lives instead of hunting through menus.
Step 3: Add your products
Open Products > Add product. Each item needs a title, a description, media, a price and a weight. SKUs and barcodes can wait until you are working with a warehouse or a scanner.
Weight is the field people skip and later regret, because shipping rates are calculated from it. Weigh the packed parcel, not the product.
Product photos take longer than anything else on this list in the stores I have set up. Shoot on a plain background, keep one aspect ratio across the catalogue, and export at roughly 1500 pixels on the long edge. Mixed shapes and sizes are what make a product grid look unfinished.
Write descriptions as if the buyer is standing in front of the item: what it is, what it is made of, what is in the box, and how long delivery takes. Skip the adjectives.
Step 4: Pick a theme and edit it
Online Store > Themes is where you choose. New stores generally start on Horizon, the free theme Shopify introduced in 2025. Dawn is still available and still updated, and both cost nothing. Paid themes in the Theme Store run from about $100 to $500 as a one-off.
Open the theme editor and work through the header, the homepage sections, the product page and the footer. Preview on your phone before you change anything else, because most of your traffic will arrive there.
Speed comes from images and apps far more than from the theme. Two heavy apps cost more load time than any free theme choice, and building a fast eCommerce site that converts covers the specifics.
Step 5: Set up payments, including the India problem
Settings > Payments is the step that surprises Indian sellers. Shopify Payments, the built-in gateway, is not available in India, so you need a third-party provider. Razorpay and Cashfree both have Shopify apps and support UPI, cards, net banking and wallets. PayU and PhonePe are the other common options. Expect KYC with PAN, a business bank account and your GSTIN.
The cost is two fees stacked. The gateway charges its own rate per transaction, and Shopify adds a third-party fee of 2% on Basic, 1% on Grow and 0.6% on Advanced. That second fee disappears only where Shopify Payments is supported.
Turn on cash on delivery under manual payment methods if you want it, and read the legal side of choosing a payment gateway in India before you sign anything.
Step 6: Shipping and taxes
Settings > Shipping and delivery is where you build shipping profiles: which products ship together, rates by zone and weight, a free-shipping threshold, and local pickup if you have a counter.
Settings > Taxes and duties handles GST. Set your rates, mark which products are exempt, and get an accountant to confirm your registration and composition position before you collect tax. Getting this wrong is expensive to unwind.
Step 7: Policies, pages and emails
Settings > Policies generates refund, privacy and terms templates. Edit them to match what you will actually do: the return window, who pays return shipping, and how long a refund takes. A policy you cannot honour is worse than no policy.
Add an About page and a Contact page with a real email address, then check the order confirmation under Settings > Notifications. It is the first email a customer receives from you, and the default text reads like a receipt from a platform rather than a shop.
Step 8: Connect your domain
Settings > Domains lets you buy a domain from Shopify or connect one you own. For an existing domain, point the A record at the address Shopify gives you and the www CNAME at shops.myshopify.com, or hand over the nameservers and let Shopify manage DNS. HTTPS is issued automatically once the domain resolves.
Keep the myshopify.com address active. It redirects to your domain and is useful when you contact support.
Step 9: Place a test order, then launch
Switch payments to test mode and place an order from your phone. Walk the whole path: product page, cart, checkout, confirmation email, and the order in the admin. Check that shipping and tax calculate correctly and that the email arrives.
Then go to Online Store, click the Private label, switch it to Public and click Launch store. The same button sits on the admin Home page, and Shopify's launch checklist covers the remaining pre-flight items. You can return the store to private mode later from Online Store > Preferences.
Step 10: After launch
Connect the channels you will actually maintain under Sales channels: Instagram and Facebook, Google and YouTube, and TikTok. Some admins also list an Agentic channel for AI shopping surfaces, but availability varies by region and plan, so treat the list as a menu rather than a checklist. Each channel needs its own product data check.
Then work on conversion rather than more setup. Optimising a Shopify store for conversion and eCommerce marketing tips for store owners are the next two reads, in that order.
What Shopify costs in 2026
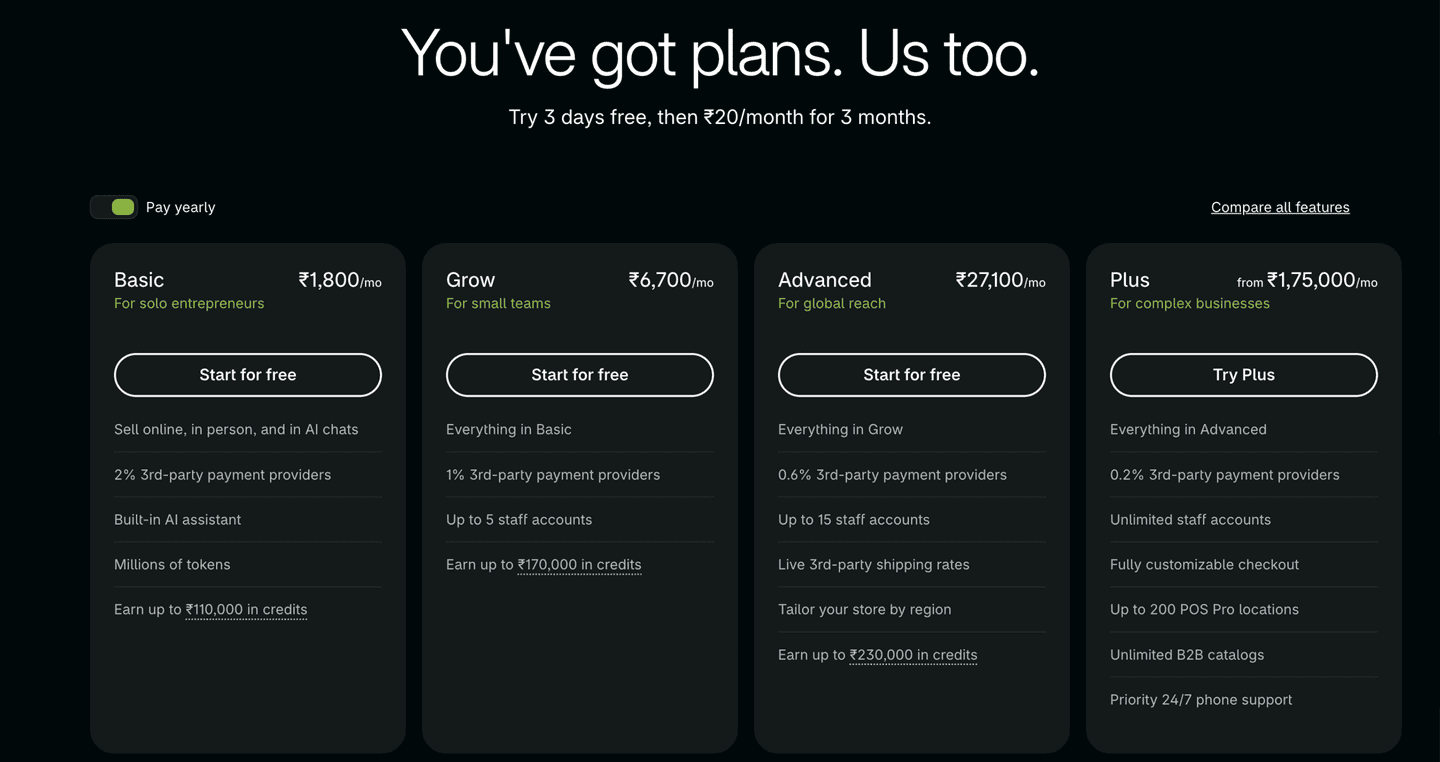
| Plan | Monthly (India) | Yearly, per month | Third-party payment fee |
|---|---|---|---|
| Basic | ₹1,994 | ₹1,800 | 2% |
| Grow | ₹7,447 | ₹6,700 | 1% |
| Advanced | ₹30,164 | ₹27,100 | 0.6% |
| Plus | from ₹175,000 | from ₹175,000 | 0.2% |
Prices come from Shopify's India pricing page in November 2026 and exclude GST. In the US the same plans list at about $39, $105 and $399 a month, or $29, $79 and $299 on annual billing. Every plan includes unlimited products, hosting, a free SSL certificate and Sidekick. Basic has no extra staff accounts, Grow allows five and Advanced fifteen.
What changed since the original guide
| The 2022 version said | What is true in 2026 |
|---|---|
| 14-day free trial | Three days free, then ₹20 a month for three months in India |
| Choose a theme from the Theme Store | New stores generally start on Horizon; Dawn stays free and maintained |
| Remove the store password to go live | Switch from private to public, then click Launch store |
| "Set up a payment gateway" | Shopify Payments where supported; India needs Razorpay or Cashfree plus a 2% fee on Basic |
| Hire a Shopify development company | You can finish this setup yourself in a weekend; hire only for custom theme code |
| Basic plan around $29 a month | ₹1,994 a month, or ₹1,800 on yearly billing in India |
FAQ
How long does it take to build a Shopify store?
The admin work is the short part: five to twenty products, a free theme and the settings screens often take about a working day between them. Photography, accurate descriptions and a courier rate card take longer, and those are the parts worth slowing down for.
What happens when the trial ends?
The store stays in your account but stops taking orders until you choose a plan. Shopify's trial terms do not say the store or its data is lost, so treat any reminder email as a nudge rather than a guarantee. You can pick a plan later and carry on from where you stopped, but do not send paid traffic to a store that is still on trial.
Is Shopify better than WooCommerce for a small store?
Shopify costs more per month but removes hosting, security patches and plugin maintenance, which is the part small sellers underestimate. WooCommerce is cheaper to start and far more flexible once you can maintain it. The WooCommerce vs Shopify comparison works through the long-term cost difference.
Before you spend on ads
Start with the catalogue, not the ad budget. Get your first five listings right, each with a clear photo, an accurate weight, a delivery estimate and a return rule. That is the difference between a store that converts its first hundred visitors and one that quietly stalls.