

I've partitioned every Mac I've owned — for Windows test drives, clean macOS installs and a stubborn exFAT drive for sharing files with a PC — and every time the job takes five minutes in Disk Utility, the tool already on your Mac. This guide walks through the exact 2026 steps, explains the one decision that trips people up (partition vs. volume on APFS), and covers when you genuinely need third-party software.
Quick Answer
Open Disk Utility (Spotlight → "Disk Utility"), select the drive, click the Partition button, press +, then name the partition, pick a format — APFS for Mac-only use, exFAT to share with Windows — set its size and click Apply. Back up first: partitioning reshapes the drive's map, and while it normally doesn't touch data, a backup is your undo button if anything goes wrong.
What You Need
- Your Mac (any model, macOS Big Sur through macOS 26)
- A backup of important files (Time Machine or a cloud copy) before you start
- 5–10 minutes
Partition vs. Volume: Read This First on Modern Macs
Since macOS 10.13, Mac drives use the APFS file system, and Apple added a clever alternative to partitioning: APFS volumes. A partition permanently divides your disk into fixed chunks of space; APFS volumes share one pool of free space dynamically. If you add a second volume for "Work" and it needs more room, it takes it automatically — no resizing ritual.
My rule of thumb in 2026: if the second space is still for macOS use, add a volume instead of a partition (in Disk Utility: select the container, click +). Choose a true partition when the other OS or device needs a fixed, separate region — a Windows drive share, a bootable installer, or a drive you'll carve up with other systems.
How to Partition a Mac Drive Using Disk Utility (Step by Step)
1. Back up your data. Time Machine to an external drive or a full cloud sync. Partitioning is routine and data-safe in practice, but you're redrawing the drive's map — carry insurance.
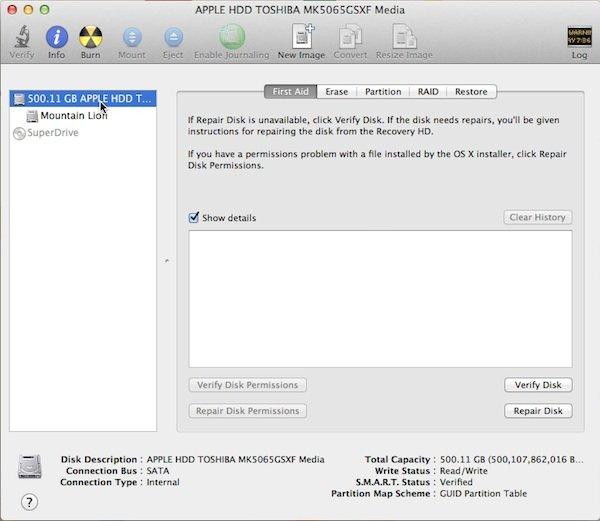
2. Open Disk Utility: press Cmd + Space, type "Disk Utility", hit Enter. (Or Applications → Utilities → Disk Utility.)
3. Select the drive in the left sidebar. Pick the top-level physical drive (usually named "Macintosh HD" — check it shows the full capacity, not a sub-volume).
4. Click the Partition button in the toolbar (alongside First Aid, Erase, and so on). If the button is greyed out, you've selected a volume — select the parent device instead.
5. Press the + button under the pie chart. macOS suggests a name and splits the current layout in half by default.
6. Name the partition — something obvious like "Windows-Share" or "Media".
7. Choose the format:
- APFS — the modern default; best if this Mac is the only user.
- Mac OS Extended (Journaled, HFS+) — only for older Macs or specific tools that demand it.
- exFAT — the pick for drives shared with Windows, cameras or game consoles; reads/writes on both platforms natively.
- MS-DOS (FAT) — fine for small cross-platform drives, but a 4 GB file-size cap makes it a poor choice for media.
8. Set the size — type the capacity in the Size field or drag the pie-chart divider. Remember the host partition needs room to breathe: leave at least 15–20% free on your macOS side.
9. Click Apply. Disk Utility reshapes the drive in a minute or two. The new volume appears on the Desktop and in the Finder sidebar.
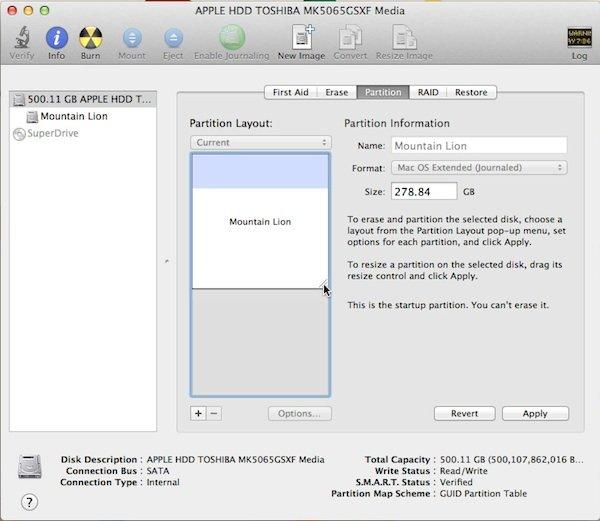
To undo this later: return to the Partition pane, select the partition you added, click the – button, and Apply. The space merges back into the main partition without data loss on the remaining volume (copy anything you want to keep off the deleted partition first).
When You Actually Need a Third-Party Tool
The internet is full of ads telling you Disk Utility is helpless. In 2026, for most people, it isn't — partitioning, resizing and formatting all work natively. That said, four legitimate gaps remain:
- NTFS — macOS reads NTFS (Windows) drives but won't write to them. A tool like Paragon's NTFS driver or free Mounty fixes that; or just format the shared partition as exFAT and skip the problem. We cover this in detail in how to write to NTFS drives on your Mac.
- Windows on Apple Silicon — Boot Camp exists only on Intel Macs; on M-series and newer machines you'll run Windows in a virtual machine (Parallels, VMware Fusion), which needs no partitioning at all.
- Resizing Boot Camp partitions on older Intel Macs is finicky — dedicated tools handle it more gracefully.
- Partition recovery after a drive misadventure is beyond Disk Utility; recovery tools like Disk Drill are the standard rescue route.
- Free and open-source GParted (run from a USB stick) covers exotic jobs like moving Linux partitions.
None of these are required for the everyday partition task above — reach for them when you hit one of the specific walls.
FAQ
Will creating a partition delete my existing files?
No — partitioning shrinks the existing volume and carves new space out of the freed area; your files stay in place. The risk isn't the routine operation, it's power loss mid-process or picking the wrong drive. That's why the backup step comes first: the procedure is safe, the insurance is free.
Should I use a partition or an APFS volume on my Mac?
Use an APFS volume if the extra space is for more macOS work — volumes share free space dynamically, so neither side ever fills up while the other sits empty. Use a real partition when another operating system, a bootable installer, or a non-Mac device needs a fixed, independent region. When in doubt on an all-Apple setup, choose a volume.
Which format should I pick for a partition shared with Windows?
exFAT, in almost every case: it reads and writes natively on macOS and Windows with no drivers, and has no meaningful file-size limit. MS-DOS (FAT32) works for small drives but caps files at 4 GB, which breaks movie and VM files instantly. Only use NTFS-linked tools when a drive must stay NTFS for Windows-only software.
Can I partition the drive macOS is running from?
Yes — Disk Utility partitions the startup drive without a boot from USB, since the operation happens at the drive's map level. Keep 15–20% of the macOS partition free so the system has room to work, and don't attempt to shrink the system partition below what's in use. A Time Machine backup beforehand remains the rule, because the startup drive is the one you can't afford to rebuild.
How do I delete a partition and give the space back to the main drive?
Open Disk Utility, select the drive, click Partition, select the partition you want gone in the pie chart, press the minus (–) button, and click Apply. Its space merges back into the neighbouring partition. Copy any files you need from that partition first — deletion here is permanent, while the main volume's data stays untouched.
Related Reading
- 10 Reasons Why You Should Backup Data to Cloud
- How to Write to Microsoft NTFS Drives on Your Mac
- Backup OneDrive Files to External Hard Drive – Handy Techniques
- Which Is The Best 1TB External Hard Disk?
—
I've repartitioned Macs across a decade of macOS versions and the last three were the easiest yet — if your disk shows something unexpected in the Partition pane, describe it in the comments and I'll help you read it.