

I merge video files on Windows every week — game clips into a montage, conference recordings into one file, camera takes into an edit — and the good news in 2026 is that you no longer need to pay for the privilege: Windows 11's built-in Clipchamp does the job for free, and FFmpeg does it faster if you don't mind a command line. This guide walks through every method worth using, with the steps I actually follow.
Quick answer: On Windows 11, open the built-in Clipchamp app, create a new video, drag your clips onto the timeline in order, and export as MP4 — merged, free, no watermark. For batch or repeat jobs, FFmpeg's concat command merges files in one line. Paid converters like WonderFox also work, but they're optional now.
What you need
- A Windows 10 or 11 PC with your video files in one folder
- For Method 1: Clipchamp (pre-installed on Windows 11; free from the Microsoft Store on Windows 10)
- For Method 2: FFmpeg (free download, ~2 minutes to set up)
- About 10-20 minutes, plus export time
One rule before any method: merge files with the same resolution, frame rate and codec whenever possible. Mismatched files get re-encoded (slower, slight quality loss) or play back oddly — the tools handle it, but matching sources always look better.
Method 1: Clipchamp (built into Windows 11)
Microsoft retired the old Photos-app video editor and shipped Clipchamp as the built-in successor — free, no watermark on 1080p exports, no account strictly required for local export (signing in unlocks cloud features).
1. Press Start, type Clipchamp, open the app.
2. Click Create a new video.
3. Drag your video files from File Explorer onto the timeline — or use Import media first, then drag them down.
4. Arrange the order by dragging clips left/right on the timeline; trim ends by dragging each clip's handles if needed.
5. (Optional) Add transitions between clips, or keep hard cuts — for a straight merge, do nothing.
6. Click Export (top right) → choose 1080p (free tier's best quality) → name the file → Save.
Clipchamp re-encodes on export, so expect a few minutes for a 10-minute merged video. The result is a single MP4 that plays anywhere.
Best for: one-off merges with a visual timeline and free output.
Method 2: FFmpeg (fastest, no re-encode)
FFmpeg is the free engine behind half the video apps you use, and its "concat demuxer" merges matching files by stitching them together — no re-encoding, which means zero quality loss and speed limited only by your disk.
1. Download FFmpeg from ffmpeg.org (Windows builds are linked from the site), unzip it, and either add the `bin` folder to your PATH or work from that folder.
2. Put your videos in one folder, open that folder in Terminal (or Command Prompt).
3. Create a list file named `list.txt` with one line per video:
“`
file 'clip1.mp4'
file 'clip2.mp4'
file 'clip3.mp4'
“`
4. Run the merge:
“`
ffmpeg -f concat -safe 0 -i list.txt -c copy merged.mp4
“`
5. `merged.mp4` appears in the folder, typically within seconds.
The `-c copy` flag is the magic — streams are copied, not re-encoded. If your files have different codecs or resolutions, FFmpeg will produce a broken file; re-encode instead (`-c copy` → `-c:v libx264 -c:a aac`) or make the sources match first.
Best for: repeated jobs, big files, and anyone comfortable pasting a command.
Method 3: Shotcut (free, full editor)
Shotcut is the best fully free desktop editor if you want timeline merging plus real editing — trimming, transitions, audio leveling — without Clipchamp's export caps or watermarks (it has none).
1. Install Shotcut, open it, click Open File for your first video, drag it to the timeline.
2. Open each next video and append it to the timeline (drag, or right-click → Append).
3. Optionally add cross-dissolve transitions between clips.
4. File → Export Video → choose the default H.264/MP4 preset → Export File.
It's more program than Clipchamp, and the interface is spartan, but it's genuinely free software with no catches.
Best for: merges that also need trimming, transitions or audio fixes.
Method 4: Paid converters (the original method, honestly framed)
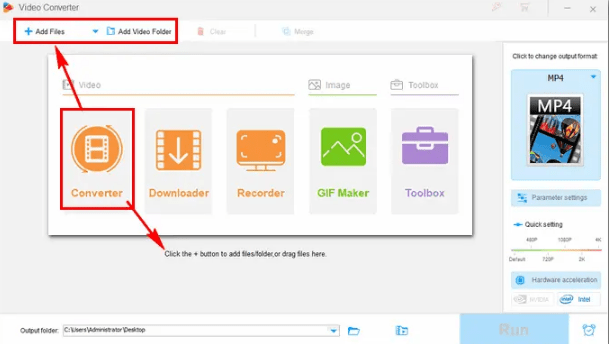
The tool this article originally existed to promote — WonderFox HD Video Converter Factory Pro — does merge videos (its workflow: add files → select items → Merge → choose output → Run), and it bundles format conversion, which is genuinely handy if your sources are a codec mess. Its tips library (like this guide to extracting subtitles from videos) is decent. The honest 2026 assessment: for merging alone, it's hard to justify paying when Clipchamp, FFmpeg and Shotcut are free — but if you already own a converter suite, use its merge feature rather than buying anything new.
Best for: people who already own a converter and need its extra formats.
Tips that save rework
- Order your files by name before importing. Renaming clips `01-intro.mp4`, `02-demo.mp4`, `03-outro.mp4` makes both the timeline and FFmpeg's list trivially correct.
- Watch for rotation metadata. Phone videos sometimes play rotated in one player and fine in another after merging; re-encoding via Clipchamp/Shotcut normalises them.
- Keep the audio in mind. Merged clips with wildly different loudness jolt the viewer — Shotcut's audio gain or Clipchamp's volume per clip fixes it in seconds.
- Export at the source resolution. Upscaling a 720p merge to 1080p adds size, not quality.
If your end goal is publishing rather than merging, our guides on converting video files to audio formats, creating videos in a minute without skills and the top online animated video applications cover the next steps.
Frequently asked questions
Does Windows 11 have a built-in video merger?
Yes — Clipchamp, pre-installed on Windows 11, merges videos on a drag-and-drop timeline and exports free at up to 1080p with no watermark. It replaced the older Photos-app Video Editor that Windows 10 users may remember. If Clipchamp isn't installed on your machine, it's a free download from the Microsoft Store.
How do I merge videos without losing quality?
Use FFmpeg's concat demuxer with the `-c copy` flag: it stitches the files' streams together without re-encoding, so output quality is bit-identical to the sources. The requirement is that all inputs share the same codec, resolution and frame rate. If they don't match, some re-encoding is unavoidable — Clipchamp or Shotcut handle that, with minimal quality loss at high export settings.
Can I merge videos of different formats (MP4 + MOV + AVI)?
Yes, but not with the no-re-encode trick. Clipchamp and Shotcut accept mixed formats on the same timeline and export a unified MP4 — the simplest route for mismatched sources. FFmpeg can also do it in one command with re-encoding: `ffmpeg -i "concat:"` alternatives get fiddly, so for mixed inputs the GUI tools are genuinely the easier path.
Why does my merged video have audio out of sync?
Almost always a source mismatch: clips recorded with variable frame rate (common from phones and screen recorders) drift when concatenated. Fix it by re-encoding through Clipchamp or Shotcut (which resample timing), or in FFmpeg by re-encoding with `-fps_mode cfr` to force constant frame rate. Test-merge two short clips before processing a big batch.
Is Clipchamp really free, or will it watermark my video?
Clipchamp's exports up to 1080p are free with no watermark; paid tiers add 4K export, brand kits and premium stock. The free tier nudges you toward those extras during export, but you can decline every upsell and still get a clean 1080p file. For most merges, you'll never see a paywall.
Related reading
- How to convert video files to audio formats
- Create stunning videos in one minute without skills
- Top online applications to create animated videos
I batch-merge screen recordings with FFmpeg every Friday — if your merged file comes out weird (sync, rotation, no sound), describe it in the comments and I'll give you the fix command.