A wide variety of PDFs may have password protection on them, preventing you or any other user from being able to make changes to the PDF, from copying part or all of it to another document, or even from printing the PDF at all.
There may also be more sophisticated restrictions such as preventing a form from being filled in or certain errors from being corrected. This can be incredibly frustrating when all you want to do is make a small change and print a PDF, and even more so when you should be able to do so because you are required to do so for work, or in order to pay a bill.
However, putting passwords on PDF documents is a practice that is getting more and more commonplace as individuals look to protect their work and their copyright in the face of so much theft of copyright on the internet.
On the other hand, you may have the opposite problem: you may have put a password on one of your own PDF documents a while ago, and now that you want to make a change or print it out, you have forgotten the password! This is potentially the most infuriating of them all because you should be able to do whatever you want to your own documents – but because you can no longer remove the password, you are looking at the PDF as if someone else created it.
This short guide will be able to help you remove that PDF password security, and therefore allow you to make any of the changes that you want to the document. The instructions aren’t complicated, but you should ensure that you follow each one to the letter before moving on to the next step.
This guide includes both offline and online methods to remove password security from PDF and make it available for printing, editing, copying, etc.
How to Check Password Security on Your PDF File
Before going further let us show you how to check whether your PDF file is protected or not. When you open a PDF document that has a password in Adobe Reader, you’ll notice the following things that indicate that the PDF file is secure:
- A) The title bar of the document will display “SECURED”
- B) The navigation panel will have a Padlock icon.
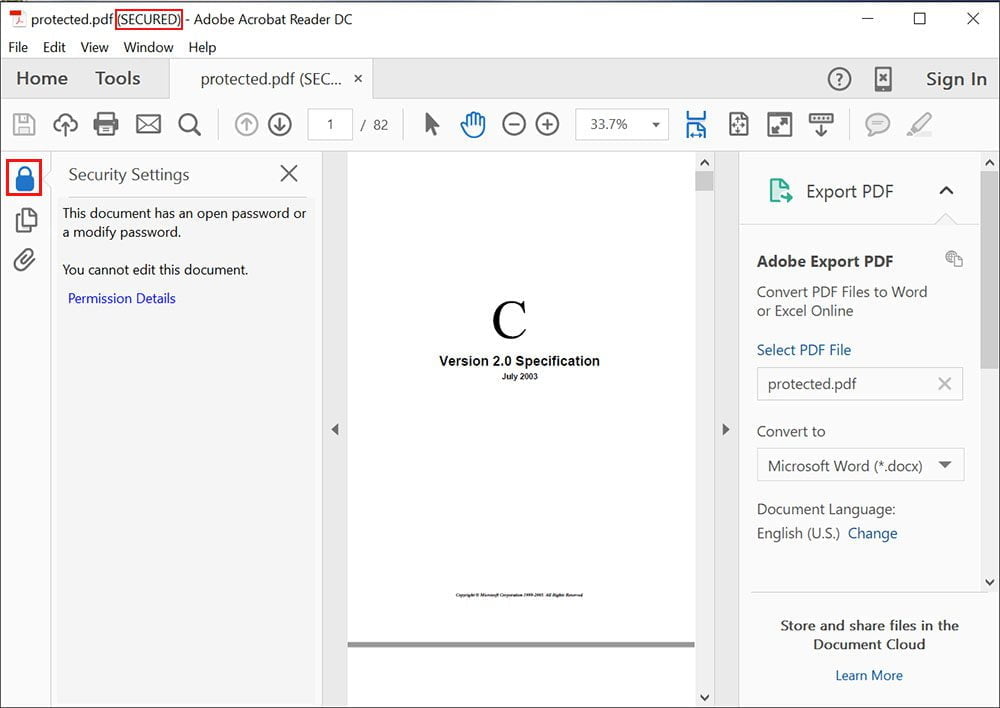
You can click on the “Lock” icon to view the security settings.
Now we’ll show you how you can remove PDF password security and freely use your PDF file. Following are the two methods that can help you to get rid of annoying PDF restrictions.
Note: You shouldn’t use these methods if you don’t have the legal right to use or modify the PDF file. Use of these methods for purposes that infringe on copyright is prohibited.
Method 1: Use a Computer Utility to Remove Password Security from Your PDF Document
We’ve tried so many services/software that claim to remove security from PDFs but we are mentioning this particular program because we’ve used this program over and over again to unlock several PDFs that we’ve needed to edit and print and I’ve never had any problems. It worked on all the encrypted pdf files (from 40-bit RC4 to 256-bit AES).
On the other hand, some online services and desktop utilities cannot decrypt PDF files encrypted with Acrobat X and later use the latest 256-bit AES encryption. You just need to follow these three quick and easy steps to remove PDF password security restrictions on printing, editing, and copying:
Step 1: Download, install, and run the program on your PC or Mac
First, download and install the program called PDF Password Remover on your computer. Download the program for your Windows PC or simply visit this website: http://www.mypdfsolutions.com/ to download the program for Windows or Mac OS. After downloading the program just follow the on-screen instructions to install it to your computer. It shouldn’t take too long to download and install. Launch the program after the installation is complete.
Step 2: Import the password-protected PDF file
Now, click the button labeled “Add Files” to import the password-protected PDF file. You can also drag and drop the secured PDF files over to the program to import them.
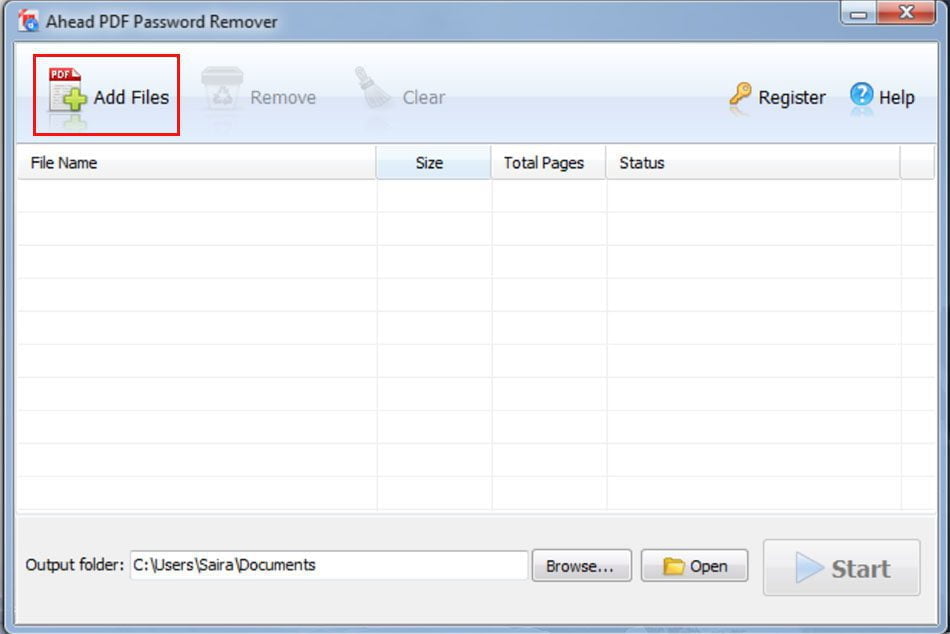
Step 3: Choose the destination folder and click the “Start” button
Finally, select the destination folder and click the “Start” button to remove the password from your PDF document. The unlocked file will be saved in the destination folder and you’ll be able to copy, print, edit this PDF, and extract text and images from this PDF.
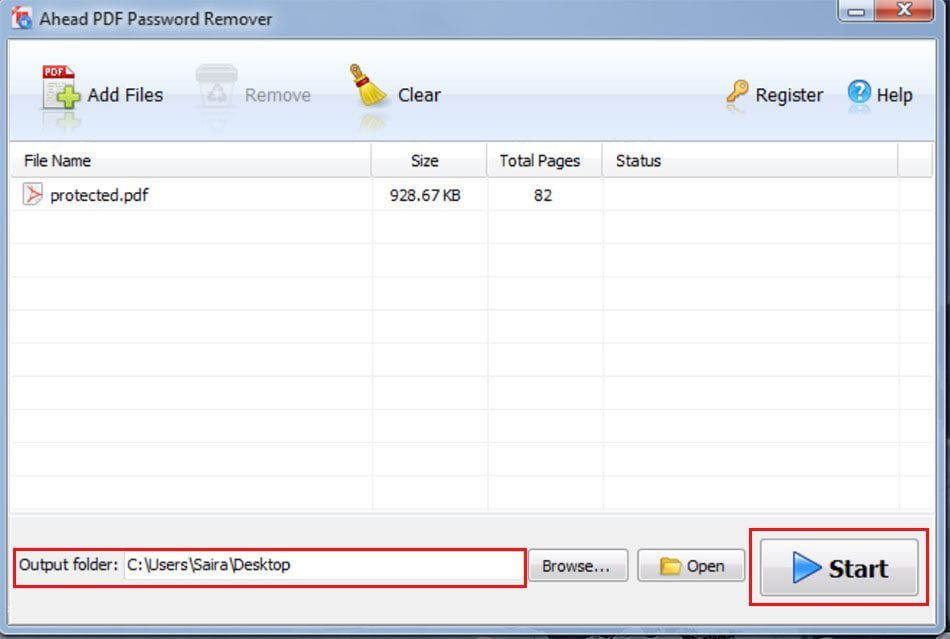
Tip: You can also use this utility to remove known open/user passwords from your PDF document so that you don’t have to enter the password every time you open your PDF file. This tool can be used to remove user/open passwords from utility bills, bank or credit card statements, and other similar PDF documents.
Method 2: Use Google Drive to Remove PDF Password Security by Converting Your PDF to Word Document
You can also upload your protected PDF file that is protected with the Owner/Permission password to Google Drive and download it as a Word file. This Word file will be free from all the restrictions imposed by the Owner’s password. You need to these 4 steps:
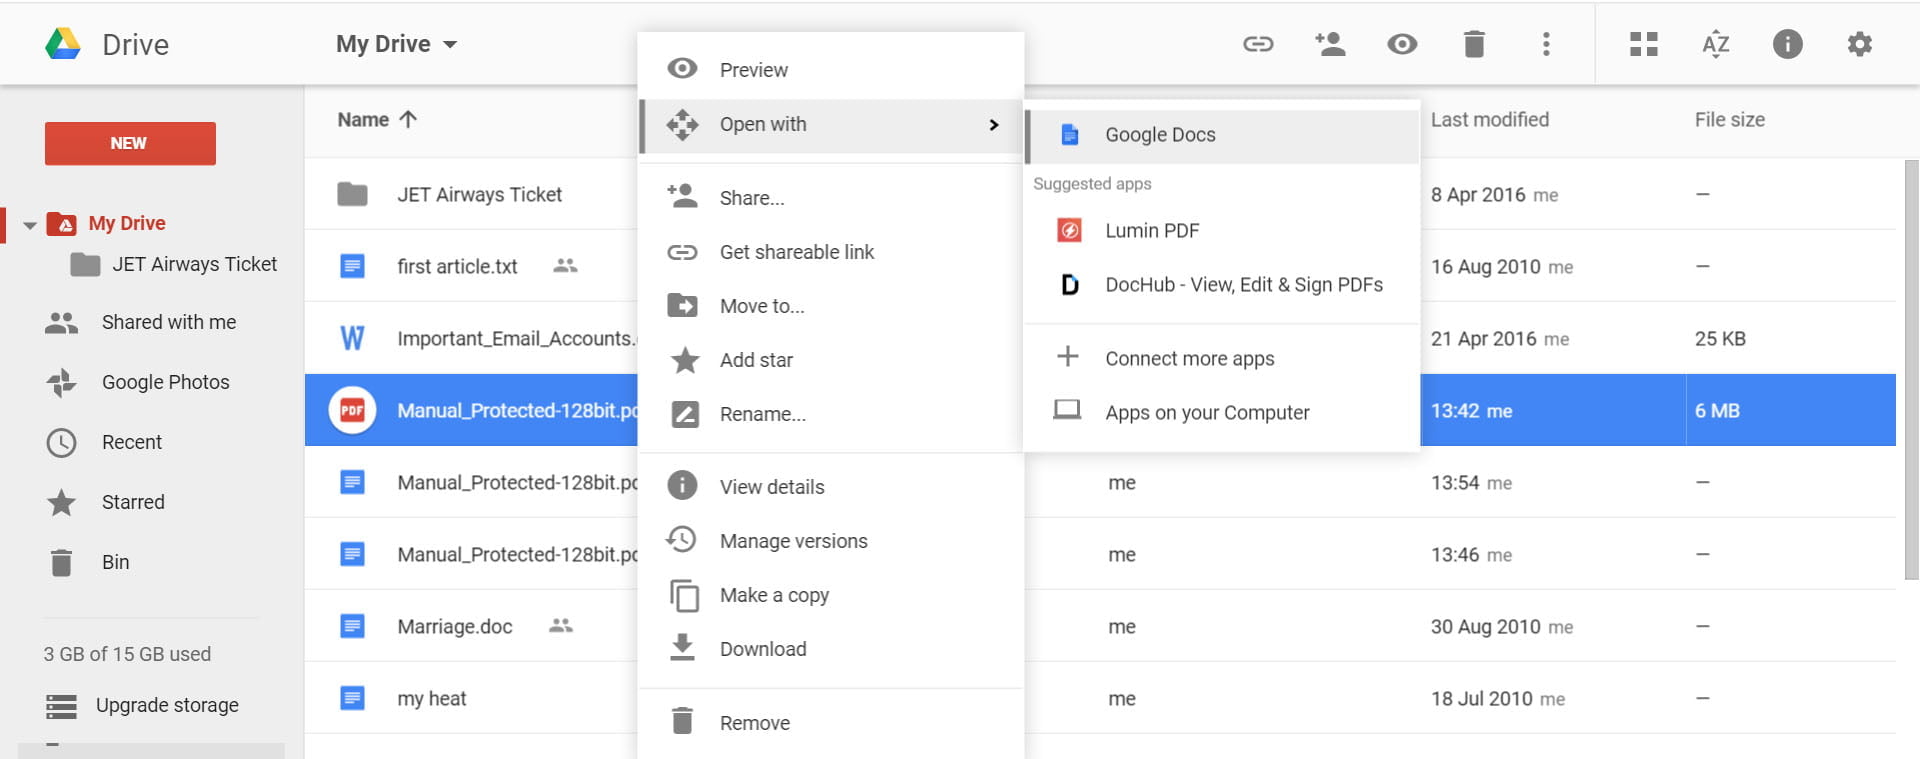
Step 1: Go to Google Drive and sign in with your Google account.
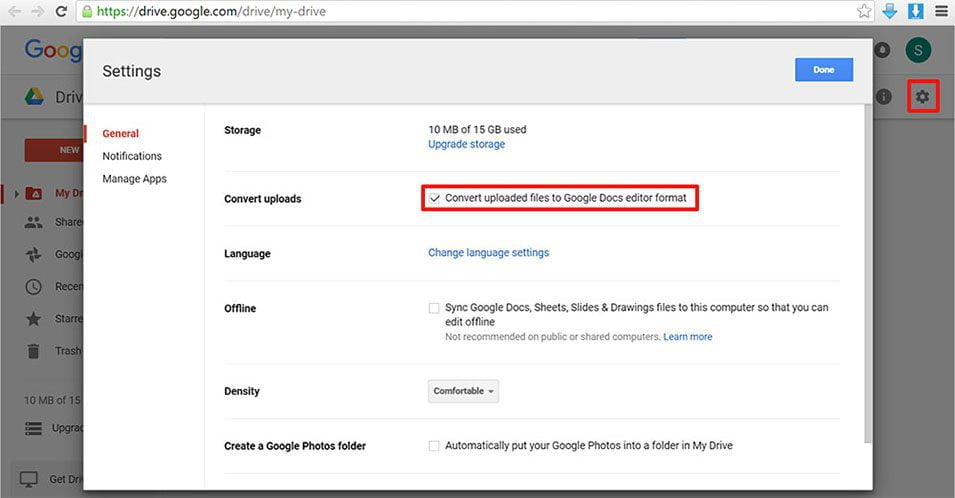
Step 2: Click the gear icon to open the Settings menu and in the General settings tab select “Convert uploaded files to Google Docs editor format.”
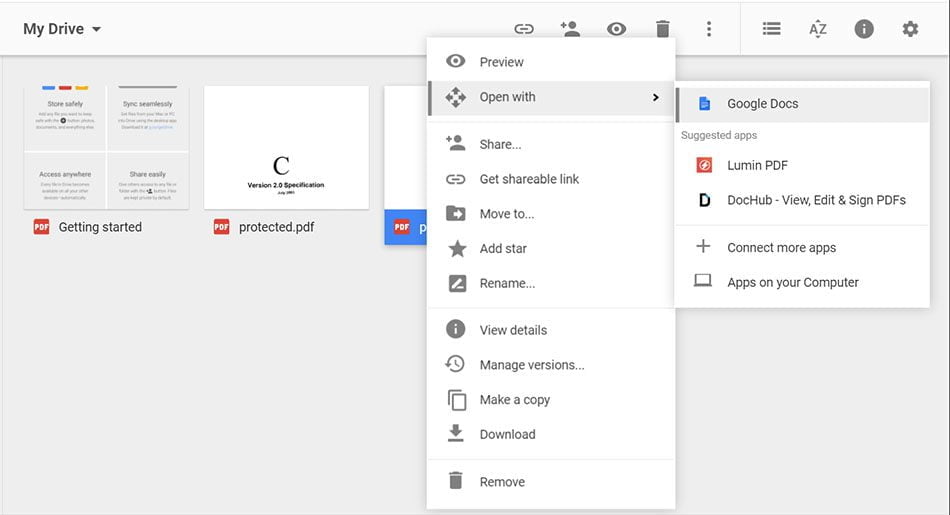
Step 3: After clicking the “Done” button upload the secured PDF to Google Drive and then right-click on your PDF and open with “Google Docs”.
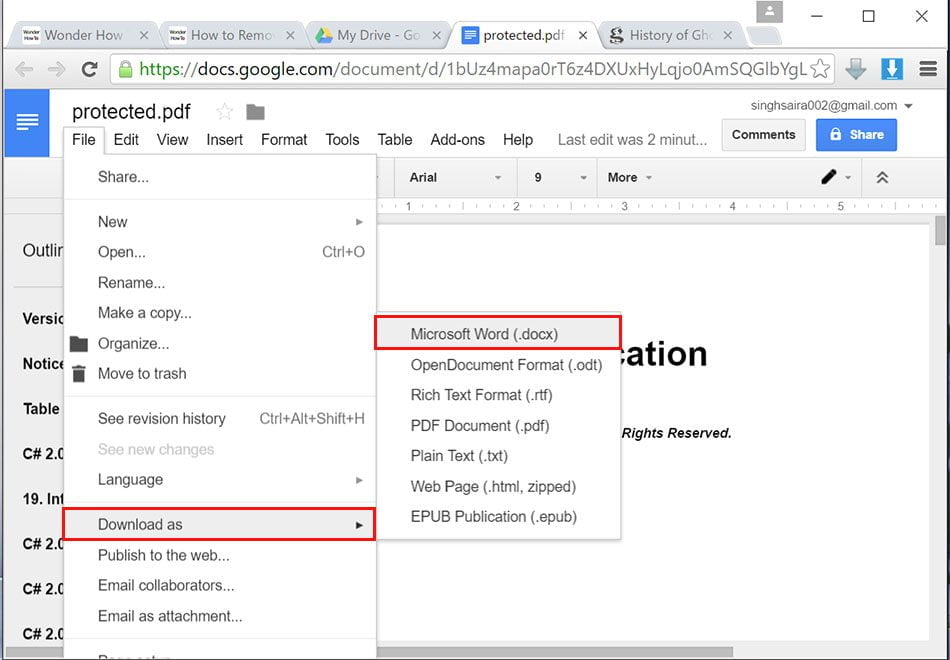
Step 4: In the end, go to File > Download as > Microsoft Word (.docx) to download your PDF as a Word File.
Now you’re free to copy content or extract images from this Word file and also edit/print without any restrictions.
Note: This method will only work on Owner password restricted PDFs and your PDF file might lose some formatting after your PDF gets converted to MS Word.


