Have you ever wished to use Android applications especially video games on bigger displays with more controls? If yes, then this article on how to install Android on a PC will help you fulfill your desire without using any emulators!
As we all know Android operating systems are so much popular. These days, most people prefer Android more than meals ;). The easy, fast, and fantastic overall performance made the platform highlighted from other OS. Android is very beneficial to the fields consisting of training, profession, enjoyment, and studies. etc. Let’s move to our topic.
Even if you have Windows or any other operating system on your PC, it is always better to hold Android too, because of its never-ending scope. There are many free & paid Android emulators easily available on the internet, but here we are going to discuss how to install Android on pc without emulators. But you may have some questions like this: “But How?”
I can clarify a little bit simply, Like installing Windows or any other operating system (Like Linux, Ubuntu, etc.) on our computer, we can install Android too. You can enter into the OS from the boot menu itself (Dual Boot Method), unlike entering from Windows using Dropbox or using any other Android emulators.
So, I think the concept is clear now! Okay, Here we are going to see two methods, the first method is too simple but only suitable for devices with Intel x86 series CPU and another method is more complex than the first. Let’s see how to install Android OS PC in detail.
How to Install Android on PC [Using Phoenix]
Phoenix Os is based on Android and specially designed for computers. It supports both 32 & 64-bit CPUs. It can be installed on the device without affecting the original document. Also, you can simply uninstall if you feel like doing so, from your primary operating system (Windows/Mac) without any complexity.
Step-1
Goto Phoenix OS Official Site http://www.phoenixos.com
Step-2
If you are a Windows user then download Exe Installer. Else, go for the ISO file.
Step-3
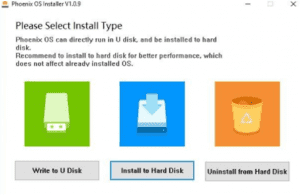
After downloading the exe file, you have to provide the location where you want to install it. Select Write to Hard Drive (recommended) or select Write to U Disk. Why recommend writing to a Hard drive? It is better to install it on the hard drive in order to enjoy maximum performance. Also, they are promising that your files will be 100% safe.

Step-4
Allocate the size and click install. Here I’m choosing 32GB. You are free to choose any of the below options according to your desire, choosing more space is always better.
Step-5
You will get a window like this. Click on reboot, so that you can enter Phoenix Os from the boot Menu.
Step-6
Then select Phoenix Os from the boot Menu… you will see something like this:
Okay, sit back and have a cup of coffee. Sorry, you won’t get enough time to complete it 😉
Step-7
Wow!! now time for the first setup. Provide the required details and proceed further.
You have successfully completed the task, well done!
How I Uninstall Phoenix Os?
As I mentioned earlier, you can simply uninstall Phoenix Os if you feel like doing so. It is also an easy task like how you install. You will not get any problems due to deleted grub or any other parts of the operating system.
In order to uninstall Phoenix: Click on the same file that we clicked once while installing the Os (i.e. click on the installation file). When you click that you will get a window like this…
Click on the Uninstall option, then finish your coffee that you put unfinished once. Unfortunately, again you will not get enough time to do so ;).
Okay. here ends the guide for Phoenix. Let’s move forward if you have any trouble with this method.
How to Install Android on PC [Using Direct ISO]
This method is harder than the previous one. And can’t promise to guarantee that it will affect your files or not. And also the procedure for removing is also difficult.
If we wish for something, then we should achieve it, right? So, let’s proceed!
Step-1
Go to UNetbootin’s official website and download UNetbootin (if you are a Windows user, then click Windows) for free https://unetbootin.github.io/
What is UNetbootin? A software that allows you to create bootable USB drivers.
Step-2
Then time to hunt the iso file http://www.android-x86.org/ Select any iso file that you need from a random one. Download for free.
Step-3
So here we have both files (iso & UNetbootin). Open UNetbootin and browse iso. Then choose a type, drive then click ok.
Select Type Hard Disk and Drive as C:\ (you choose, if you want to install it on USB then simply choose type as USB)
Step-3
After completion, Restart your computer and choose UNetbootin from the boot menu.
Done! You can now enjoy Android on your PC.
Additional: Test Apk using chrome extension[Size: 12MB]
You can test apk (Android executable file) files using a Chrome extension called ARC Welder
Conclusion
I always recommend using Phoenix. As I said before, it is specially designed for computers. Although you can opt for any of these methods.


